Programming, graphics, games, media, C++, Windows, Internet and more...
Entries for tag "video", ordered from most recent. Entry count: 17.
# Porting your engine to Vulkan or DX12 - video from my talk
Fri
06
Jul 2018
Organizers of Digital Dragons conference published video recording of my talk "Porting your engine to Vulkan or DX12":
PowerPoint slides are also available for download here: Porting your engine to Vulkan or DX12 - GPUOpen.
Comments | #vulkan #directx #teaching #events #video Share
# I Implemented Video and GIF Playback with FFmpeg
Thu
27
Apr 2017
I started my music visualization project with a possibility to load a collection of static images, accompanied with metadata that describe their parameters like dominant colors, whether it uses alpha transparency or whether it is tileable (description of these parameters could be a topic of another blog post). I then render them as textures, moving, rotating and changing colors randomly, blended together, with a possibility of feedback from previous frame. This mathod may sometimes generate quite interesting images, but it has its own limitations and becomes boring after some time.

Generating some interesting graphics procedurally from scratch is my ultimate goal. But while writing shaders is fun and can give amazing results (as we can see on ShaderToy), it's also the hard way. So to be able to show something interesting, for now I've implemented playback of videos and animated GIFs, using FFmpeg library.
FFmpeg is a free tool that contains its own codecs for various video and audio formats (so it doesn't use the codecs installed in Windows). It is known as a command-line program that can convert about any video format, but it's also a software library that offers this encoding/decoding features to developers. I learned to use this library because I needed to implement video playback for one of my shows.
Later I discovered that it can play animated GIFs as well. This is a great feature, because having hundreds of such GIFs downloaded and being able to switch between them in an instant can make quite interesting visuals. There are many abstract, geometric, psychedelic animations shared all around the Internet, like on Op Art or Fractalgasm Facebook pages. At the same time, possibility to play all popular video formats is much more comfortable than what Resolume offers, which requires converting all the footage to its own codec, called DXDI (by the way, FFmpeg is able to play this as well).
I won't show any source code this time, but if you are a developer and consider implementing support for video playback or encoding, I recommend FFmpeg library. Other option is libVLC - a library behind popular VLC media player, which also has its own set of codecs. I also used it some time ago. Playing anmimated GIF-s is also possible through Windows Imaging Component (WIC), which is part of standard Windows API.
Comments | #vj #video #graphics Share
# How to download videos from YouTube and other sites in Full HD (1080p)?
Sun
19
Feb 2017
If you, just like me, don't like to rely on data stored in the "cloud" (i.e. someone else's computer) and prefer to have it available offline on your hard drive, you probably tried to find a way to download video and music from YouTube and other similar services. There are web pages for that, but they are full of ads, malware and fake "Download" buttons. That's why my favorite way is to use youtube-dl. It works perfectly, is constantly updated and maintained, is open source and supports downloading from almost 1000 (!) different websites, including YouTube, Vimeo, Facebook videos, Soundcloud, Mixcloud and even XXX websites. The only drawback: it's a command line program, so you have to download it and then run it from console with correct parameters. But it's actually quite simple, as you can see below. (If you want to see a simpler, window-based solution, go to the end of this post.)
To use it, first go to the youtube-dl website and download "Windows executable". It's a single file - youtube-dl.exe, which doesn't need any installation. Just put it in some directory on your hard disk, like I did in F:\Programs.
Next, browse to YouTube or other website, find the video you want to download and copy its URL (link) from address bar to the clipboard. Example: "https://www.youtube.com/watch?v=9bZkp7q19f0".
Finally, open command prompt. In Windows 10 you can do it e.g. by opening Start menu and searching for "Command Prompt". In the console, issue following commands:
F: - to change drive to correct one, if needed.cd \Programs - to enter the directory with your program.youtube-dl.exe https://www.youtube.com/watch?v=9bZkp7q19f0 - to download video from specific URL.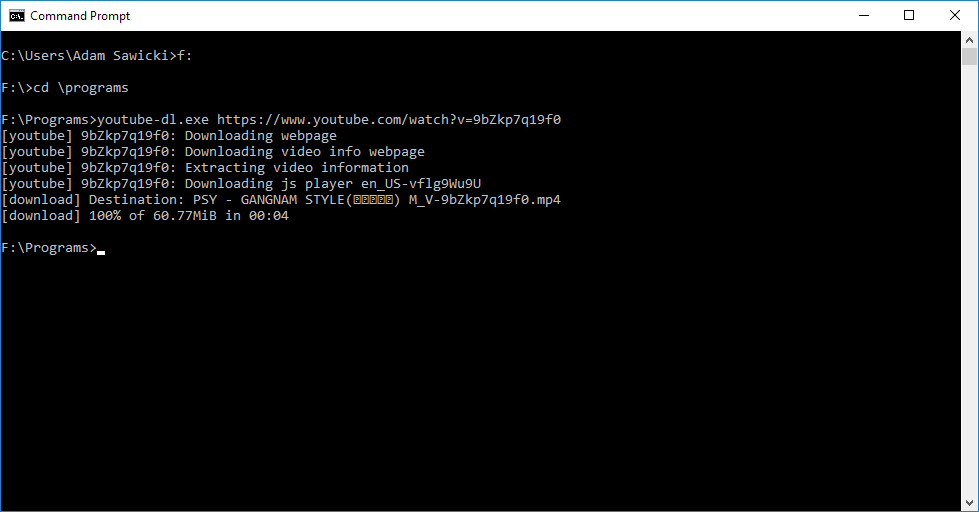
The video is downloaded to the same directory where you've put the program. Its file name contains title of the video, its YouTube identifier and correct extension, depending on particular video format. For example, mine was: "PSY - GANGNAM STYLE() M_V-9bZkp7q19f0.mp4".
That's all basically, but please keep reading if you want to avoid unpleasant suprises, because there are still two important things to know.
First is that sometimes downloading doesn't work. It happens probably because YouTube changes the way the video is served on their website, like the details of their HTML code. Fortunately youtube-dl is quickly adjusted to it, so if you encounter any download error, you probably just need to update the program to the latest version. You don't even need to go to their website - the program has a feature to update itself. All you need to do is to issue command:
youtube-dl.exe -U
Example:

Second problem is that youtube-dl only downloads YouTube videos in HD (720p) quality, not Full HD (1080p). That's because YouTube provides Full HD video and audio streams separately so they need to be merged on the client side. Good news is that youtube-dl can do it for you. Bad news: it needs additional program for that, called FFmpeg. So to be able to download videos in FullHD quality, you should additionally:
F:\Programs. This software also doesn't need any installation.bin subdirectory, where you can find ffmpeg.exe and save its path. In my case it is: f:\Programs\ffmpeg-20170214-8fa18e0-win64-static\bin.Now, to download Full HD video, issue following console commands:
F: - to change drive to correct one, if needed.cd \Programs - to enter the directory with youtube-dl.set PATH=%PATH%;f:\Programs\ffmpeg-20170214-8fa18e0-win64-static\bin - to temporarily add directory with ffmpeg.exe to the PATH environmental variable, so youtube-dl will be able to use it.youtube-dl.exe -f bestvideo+bestaudio https://www.youtube.com/watch?v=9bZkp7q19f0 - to download video from specific URL using best video and audio quality available.Now youtube-dl will download the video stream, audio stream and merge them into final file using FFmpeg, so you can enjoy best quality video and audio, downloaded on your hard drive.

Update: There is also a simpler, window-based solution: DLNow Video Downloader. It's a commercial program with 30-day free trial that is actually a GUI overlay on top of youtube-dl, ffmpeg, and rtmpdump. I recommend it, because it supports all these video websites and is very easy to use. I think that charging $19 is fair, comparing to all the other programs that claim to be "free" while they install some adware or show you ads. This one doesn't.
Comments | #internet #video Share
# Color Temperature of Your Lighting
Sun
02
Oct 2016
In photography, video and all graphics in general there are so much more parameters to consider than just exposure, meaning lighter or darker image. One of them is color temperature, or white balance. It's about what we consider "white" - a frame of reference, especially concerning light source and so all the objects lit by it. It's not real temperature, but we measure it in Kelvins. Paradoxically, lower color temperature values (like 3000K) mean colors that we call "warmer" - more towards yellow, orange or red. Higher temeratures (like 7000K) mean "cooler" colors - more towards blue. Values like 6500K are considered equivalent of a sunlight during the day, while light bulbs usually have around 3000K. Color temperature of your lighting is important when you work with colors on a computer. They recommend to use 6500K light source for that purpose.
I decided to make an experiment. Below you can see photos of part of my room, with a test screen displayed on my monitor, piece of my wall (behind it, supposed to be white) and a piece of furniture (the right part, also should be white). The monitor is LG 23MA73D-PZ, with IPS panel, calibrated to what I believe should be around 6500K (setting Colour Temperature = Warm2).
Left column shows a photo taken in the middle of the night, with lighting by LED lamps having 3000K color temperature. Middle column is the same scene lit by different LED lamps having 6500K. Finally, right column show a photo taken during the day, using only sunlight.
The only remainig variable is white balance of the photo itself. That's why I introduced two rows. Top row show all three photos calibrated to same white balance = 6500K. As you can see, the image on the screen looks pretty much the same on all of them, because monitor emits its own light. But the wall and the furniture, lit by a specific light source, seems orange or reddish on the first photo, while on the other photos it's more or less gray.
Our eyes, as well as cameras can adjust to changing color temperature to compensate for it and make everything looking neutral-white again. So the second row shows same photos calibrated to white balance of the specific light source. Now the wall and the furniture looks neutral gray on all of them, but notice what happened with the image on the screen when light was 3000K - it completely changed colors of the picture, making everything looking blue.

That's why it's so important to consider color temperature of your light sources when working with color correction and grading of photos, videos or some other graphics. Otherwise you can produce an image that looked good at the time of making, but turns out to have some color cast when seen under different lighting conditions. Of course, if you just work with text or code, it doesn't matter that much. It is more important then to just have a pleasant lighting that doesn't cause eye strain, which would probably be something more like the 3000K lamps.
Comments | #graphics #photography #video Share
# How to quickly convert MKV to MP4 file using VLC?
Fri
22
Jan 2016
Do you have a video in MKV file and you can't open it because some program (like Sony Vegas Pro) doesn't support this format? If so, you probably wonder how to convert it into some different format. I just discovered a way to do this.
Important update 2020-03-22: I found another way to quickly remux MKV to MP4 using OBS Studio. This is a free and open source app intended mostly for video recording and streaming. The feature we need can be found in menu File > Remux Recordings.
To understand this method, first you need to know that media file formats are just containers (for example, MKV is Matroska). Each format encapsulates a set of streams, usually one video and one audio stream. Now, each stream is encoded using some specific codec. There may be various codecs used, but for the file I needed to convert, Media Player Classic (my favorite movie player, installed with K-Lite Codec Pack) shows following information after selecting File > Properties:
Type: Matroska
Video: MPEG4 Video (H264) 720x400 25fps [V: English [eng] (h264 main L4.0, yuv420p, 720x400) [default]]
Audio: AAC 44100Hz stereo [A: aac lc, 44100 Hz, stereo [default]]
MPEG4 Video is the same codec that may be used with MP4 file format! It means we could convert ("repack") the file to just different container format, rewriting streams as-is without actually converting video or audio - which should be very fast (converting a long movie takes only few seconds) and wouldn't cause any quality loss.
To do that, I used VLC media player. This program has its own set of codecs for many video and audio formats, so it doesn't depend on codecs installed in Windows. The player is actually just an overlay on top of a powerful library that can also do different things, like streaming video over network (that's probably where the company name "VideoLAN" comes from) or convert files.
So to convert an MKV file to MP4:
# Writing OFX Video Processing Plugin
Wed
01
Oct 2014
Computer graphics is a broad topic and GPU-accelerated real-time 3D rendering is just one of its parts. Another one is photo and video processing. Video editing is an art by itself, but from the technical point of view there are various interesting effects that can be applied. While not essentially real-time and often done on CPU, of course it could also be GPU-accelerated and also should be as efficient as possible. There are many video editing programs, from Windows Movie Maker to Adobe Premiere. The one of my choice is Sony Vegas Pro. Such programs come with a bundle of standard effects, but for a graphics programmer what can be more fun than writing own plugin?
Vegas Pro supports plugins in OpenFX (OFX) standard. They are written as native code compiled to DLL library with appropriate interface. I'm learning how to write such plugins. Below is a description of how you can start experimenting with this technology plus my "Hello World" example that performs simple color inversion. Maybe later I will write a tutorial with detailed description of this API. For now, here is C++ source code of my example with Visual Studio 2013 project and compiled binaries (Win32 and x64): OfxTest1.zip (21 KB). Inside Vegas Pro it looks like this:

A brief description of how to start coding such plugins:
c:\Program Files\Common Files\OFX\Plugins\Basic.ofx.bundle\Contents\Win64\Test1.ofx.Note that examples provided on SourceForge next to includes package are broken. When compiled in Visual Studio, they assert in Debug configuration due to usage of uninitialized variables and stack corruption! Patch for these bugs is submitted for over 2 years (#1 Basic in Examples - uninitialised variables) and the author is not fixing it. My example has all of this fixed.
Comments | #openfx #video Share
# Rendering Video Special Effects in GLSL
Mon
16
Jun 2014
Rendering real-time, hardware accelerated 3D graphics is one aspect of computer graphics, but there are others too. Recently I became interested in video editing. I wanted to add some special effects to a video and was looking for a technology to do that. Of course video editing software usually has some effects built-in, like different filters or transition effects, some borders or gradients. But I wanted something different. If I had and I knew how to use software like Adobe After Effects, I'm sure that would be the best and easiest way to make any effect imaginable. But as I don't, I decided to use what I already know - to write a shader :)
1. To run a shader, some hosting app is needed. Of course I could write one in C++, but for the purpose of this work it was enough to use Live Coding Compo Framework (a demoscene tool created by bonzaj, which was used during last year's WeCan demoparty). This simple and free package contains rendering application and preconfigured Visual Studio solution. Having VS installed (it works with Express version as well), all I needed to do was to edit "Run.bat" file to point to directory with VS installation in my system. Next, I just executed "Run.bat", and two programs were launched. On the left monitor I had fullscreen "Live Coding Preview", on the right: Visual Studio with special solution opened. I could then edit any of the GLSL fragment shaders contained in the solution. Every time I hit Compile (Ctrl+F7), the shader was compiled and displayed in the preview.
2. Being able to render my effect in real-time, next I needed to capture it to a video. Probably the most popular app for this is FRAPS. I ran it, set Video Capture Settings to frame rate that I was going to use in my final video (which was 29.97 fps) and then captured appropriate period of time of rendering my effect, starting and stopping recording with F9 hotkey.
3. Video captured by FRAPS is in full, original resolution and encoded with some strange codec, so next I needed to convert it to desired format. To do this, I used VLC media player. Some may think that it's just a video player, but in fact it's incredibly powerful and flexible video transmitting and processing software. (I once had an opportunity to work with libVLC - its features exposed as C library.) Its greatest advantage is that it has its own collection of codecs, so it doesn't care whether you have appropriate codecs installed in your system. To convert a video file, I selected: Media > Convert / Save..., selected my AVI file captured by FRAPS, pressed "Convert / Save" button, selected Profile: "Video - H.264 + MP3 (MP4)", customized it using "Edit selected profile" image button, selecting: Encapsulation = MP4/MOV, Video codec = MPEG-4 (on Resolution tab, I could also set new resolution to scale the content, my choice was 1280px x 720px), Audio disabled, Subtitles disabled. Then after pressing "Save", selecting path to destination file, pressing "Start" and waiting some time, I had my video converted to more standard MPEG-4 format (and more than 5 times smaller than the original one recorded by FRAPS).
4. Finally I could insert this video onto a new track in my video editing software and enable blending with underlying layer to achieve desired effect (I used "Overlay" blending mode and 50% opacity).
There are some details that I intentionally skipped here (like video bitrate) not to make this post even longer, but I hope you learned something new from it. My effect looked like this, and here is the source code: Low freq fx.glsl

By the way, here is another tutorial about how to make GIF like this from a video (using only free tools this time):
1. To capture video frames as images, use VLC media player:
2. To merge images into animated GIF, use GIMP:
Comments | #rendering #video #tools Share
# Sunday in Warsaw - a Time-Lapse Video
Sun
03
Oct 2010
I've made my first time-lapse video today. This is a technique in which you capture an image every several seconds, merge these images into a video and the result looks like the time is moving very fast. Here it is:
To make it, I used my webcam connected to my laptop (because USB cable was to short to connect it to my desktop PC :) Of course a special program had to be used to utilize webcam this way, taking snapshot to a JPEG file every several seconds. The program I used is booru WebCam 2.0. It does a good job and it's free, opposite to many others tools of its kind. The result of this program working for several hours was 805 MB of files named like "image-4887.jpg". I had to use another program to convert them to a video.
This can be done with powerful and free VirtualDub. It's not so obvious how to do it though, because there is no "Import images" command in the menu. Instead, one have to know that it's enough to issue a standard File / Open video file command and open first image with it. VirtualDub automatically recognizes subsequent images as video frames. Now the only thing that remained was to set Video / Frame Rate, Audio / Audio from other file, setup filters (resize in my case), video codec and encode final video with File / Export as AVI.